02 September 2024
Introduction
In the fast-paced world of mobile development, manual deployment processes can introduce delays and errors. Automating the deployment of iOS applications not only saves time but also ensures consistency across releases. In this post, I will guide you through setting up a fully automated pipeline for generating iOS distribution certificates, provisioning profiles, building, and deploying your app using GitHub Actions and the App Store Connect API.
Problem Statement
When managing an iOS app’s lifecycle, developers often face the challenge of maintaining a seamless and efficient deployment process. Manually generating distribution certificates, provisioning profiles, and handling code signing can be time-consuming and error-prone. This process becomes even more cumbersome when deploying apps frequently, as every release requires repetition of these steps, which could lead to inconsistencies, delays, or even failed submissions. To overcome these challenges, automating the entire iOS deployment pipeline using GitHub Actions and the App Store Connect API is a powerful solution. This blog addresses how to eliminate manual intervention and build a repeatable, fully automated deployment pipeline that ensures consistency and reliability in your iOS app releases.
Prerequisites
Before we dive in, ensure that you have the following:
- An App Store Connect account with the necessary access rights.
- A project with a configured Bundle ID and app created on App Store Connect.
- A GitHub repository hosting your iOS project.
Environment Variables:
Environment variables set up:
- APP_STORE_CONNECT_ISSUER_ID: This is the unique identifier for your App Store Connect account, necessary for generating JWT tokens for API access.
- APP_STORE_CONNECT_KEY_ID: This is the ID of the private key used to sign JWT tokens. It is associated with the App Store Connect API key.
- APP_STORE_CONNECT_PRIVATE_KEY: The private key itself, used to sign the JWT tokens. This key should be stored securely and should never be committed to the
repository.
For a detailed guide on generating these values, you can refer to Apple’s official documentation or a walk through video https://www.youtube.com/watc ?v=CmhNHNCorIY
Basic Knowledge:
Also, knowledge about these topics
What is GitHub & VCS: https://blog.hubspot.com/website/what-is-github-used-for
What is GitHub Actions: https://docs.github.com/en/actions/learn-github actions/understandinggithub-actions
What is CI/CD: https://youtu.be/scEDHsr3APg?si=cnJtaMlvPFhjBnaI
What is pipeline: https://www.techopedia.com/definition/5312/pipeline
Overview of the Process
The overall process consists of:
- Generating a Certificate Signing Request (CSR) and RSA Private Key.
- Using the App Store Connect API to create a distribution certificate.
- Converting the certificate to p12 format and storing it securely.
- Generating JWT token for authenticating API.
- Generating and installing a provisioning profile using the API.
- Setting up environment variables, necessary dependency steps for iOS build.
- Creating Archive build for deployment.
Understanding Microservices and Their Impact on Team Structure
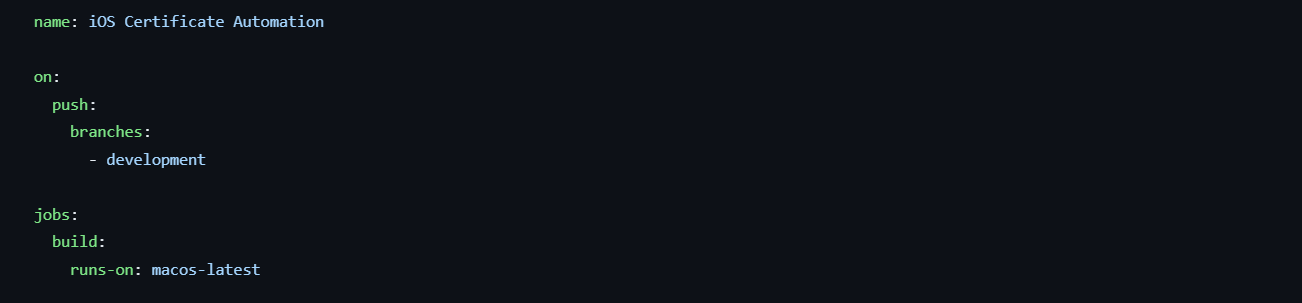
Step 1: Set Up GitHub Actions Workflow
We start by defining a workflow in .github/workflows/main.yml. This workflow includes steps to automate certificate creation, provisioning profile setup, and eventually, the iOS app build process. The trigger for this workflow can be a push to a specific branch. The command runs-on defines the environment where the workflow will perform operations.
Step 2: Generating JWT Token
Next, we generate a JWT (JSON Web Token) required to authenticate with the App Store Connect API. This JWT is then used to request App Store Connect APIs.

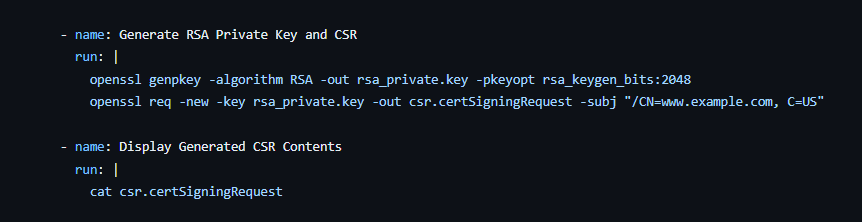
Step 3: Generate CSR and RSA Private Key
Generating a CSR is the first step in requesting a distribution certificate. We use OpenSSL to create both the RSA private key and CSR. These will be used later to request a distribution certificate via the App Store Connect API.
Step 4: Create Distribution Certificate Using App Store Connect API
Creating a distribution certificate is a crucial step in automating iOS app deployment. With the App Store Connect API, you can programmatically generate a distribution certificate without manual intervention, making your CI/CD pipeline more efficient

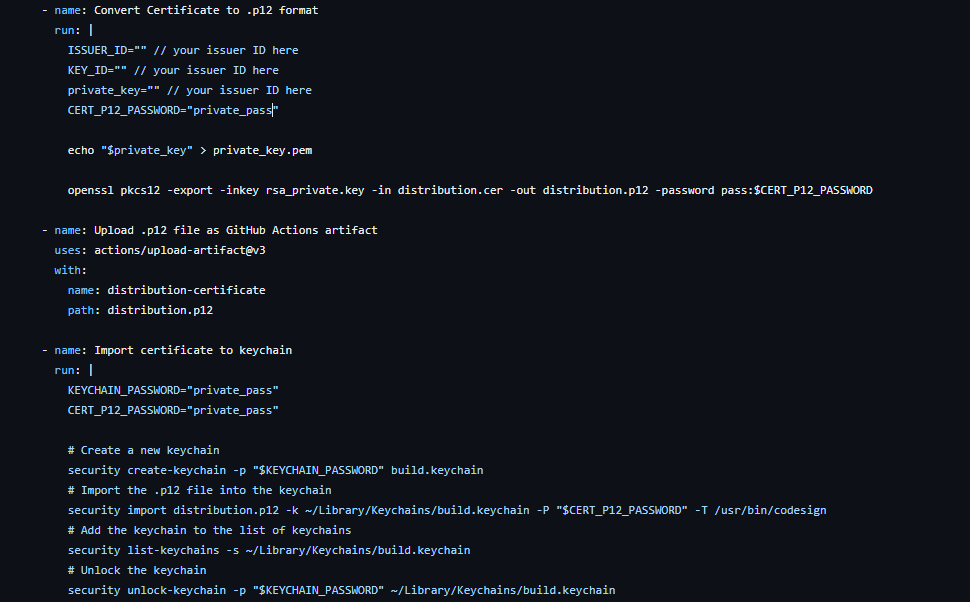
Step 5: Convert Certificate to .p12 Format and Import it to Keychain
The distribution certificate must be converted to a .p12 format for code signing. This is done using OpenSSL, where the private key is exported and combined with the certificate to generate the .p12 file, secured with a password. The resulting file is then uploaded as an artifact in the GitHub Actions workflow.
Next, the .p12 file is imported into a newly created keychain on the macOS runner. This keychain is unlocked and added to the list of available keychains, making it ready for use in the code signing process
Step 6: Set Up the Build Environment
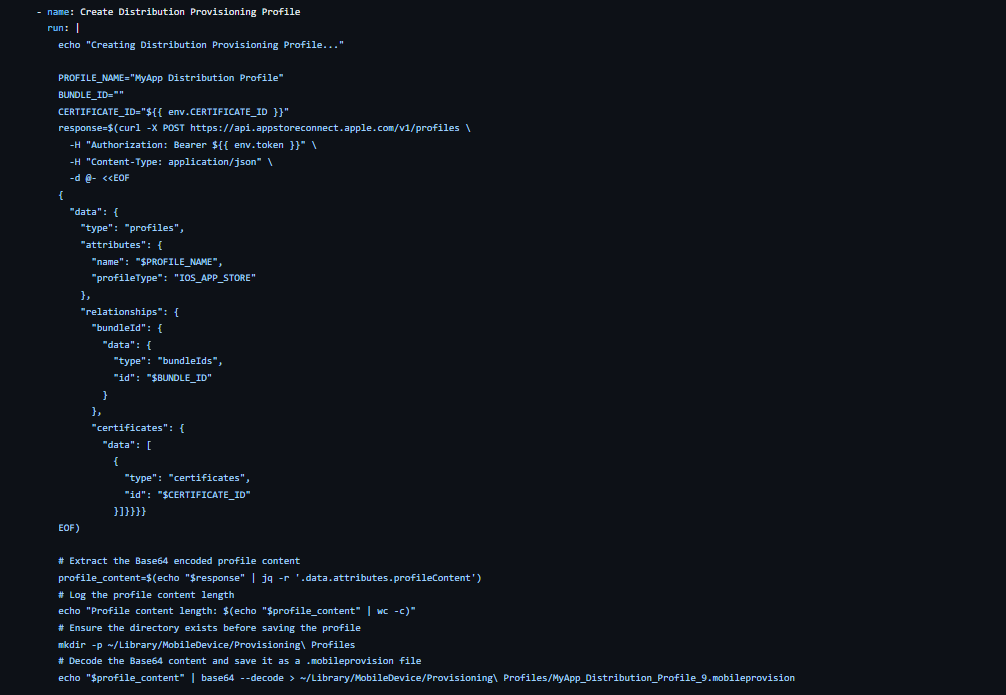
The next step is to create a provisioning profile linked to our app’s Bundle ID and the newly created distribution certificate. After creation, the profile is downloaded, decoded, and saved for use in the Xcode build process. This profile is critical when generating an Archive build, ensuring the app is signed correctly and adheres to Apple’s distribution requirements, enabling a smooth submission to the App Store.
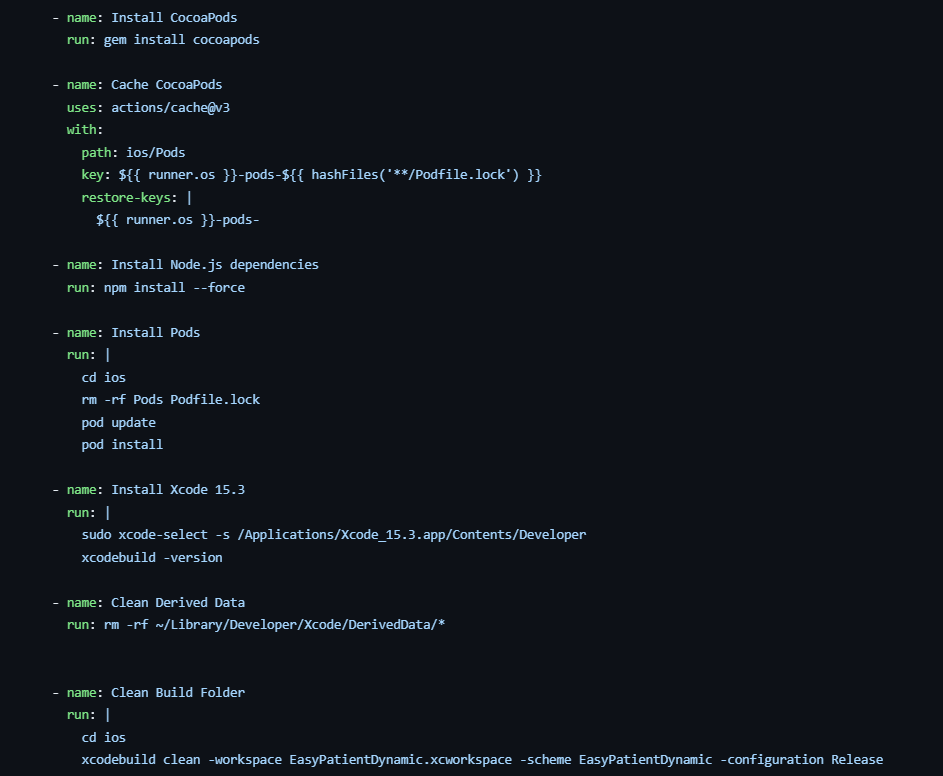
Step 7: Set Up the Build Environment
In this step, we prepare the environment for a smooth iOS build. We start by installing CocoaPods and caching them to speed up future builds. Then, we install the necessary Node.js dependencies for our React Native project.
Next, we handle CocoaPods by navigating to the ios directory, removing any existing Pods, and running pod update and pod install to ensure all dependencies are up-to-date. We switch to Xcode 15.3, clean derived data, and clear the build folder to prevent conflicts. These actions set the stage for a clean and error-free build process.
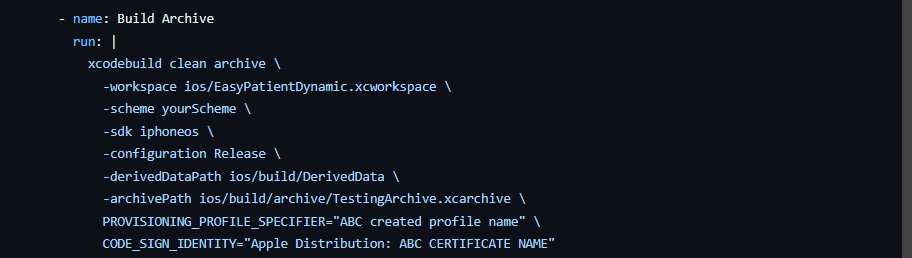
Step 8: Build and Archive the App
In the final step, we execute the xcode build command to clean and archive the app. The following key parameters are set dynamically:
- Workspace: Specifies the path to the workspace file, ensuring the correct project setup.
- Scheme: Points to the EasyPatientDynamic scheme for a proper build configuration.
- SDK: Uses iphoneos to target real devices.
- Archive Path: Determines where the build archive is saved.
- PROVISIONING_PROFILE_SPECIFIER: Links to the specific provisioning profile required for distribution.
- CODE_SIGN_IDENTITY: Defines the distribution certificate to sign the app securely.
This command produces a clean, signed archive ready for further processing, such as exporting for distribution or uploading to the App Store.
Conclusion
Automating your iOS deployment process using GitHub Actions and the App Store Connect API is a game-changer for developers. By integrating these tools into your CI/CD pipeline, you eliminate the need for manual certificate management, provisioning profile creation, and app signing. This not only saves time but also minimizes the risk of human error, ensuring that your app deployments are consistent and reliable. With the setup outlined in this guide, you can focus more on building great features and less on the complexities of the deployment process. As iOS development continues to evolve, having an automated deployment pipeline will keep your workflow agile and efficient, ultimately leading to quicker and more successful releases.