Unlocking the Power of AI and Search: Enhancing Knowledge with ChatGPT and Elasticsearch
In recent years, the convergence of artificial intelligence and advanced search technologies has opened up exciting possibilities for enriching our knowledge bases and streamlining information retrieval. At the forefront of this revolution is ChatGPT, a remarkable AI model developed by OpenAI, and Elasticsearch, a highly effective search engine designed for precision and relevance.
Technical Setup:
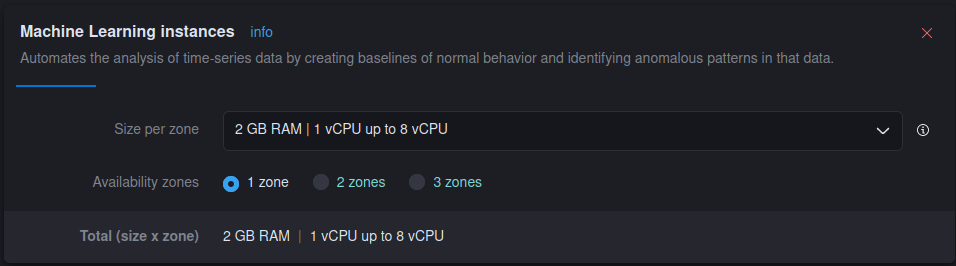
Begin by configuring a machine learning node on your Elastic Cloud with 2GB of RAM.If you do not have Elasticsearch, proceed to deploy Elasticsearch.
- After this we will be integrating an embedded model into Elasticsearch, facilitating the generation of vectors for our blog titles and user search queries.
- Specifically, we will employ the all-distilroberta-v1 model, a creation of SentenceTransformers hosted on the Hugging Face model hub.
- While this particular model is not mandatory for our setup, it proves valuable due to its broad training on extensive datasets spanning diverse topics.
- However, in vector search scenarios, fine-tuning a model to align with your specific dataset typically yields superior relevance.
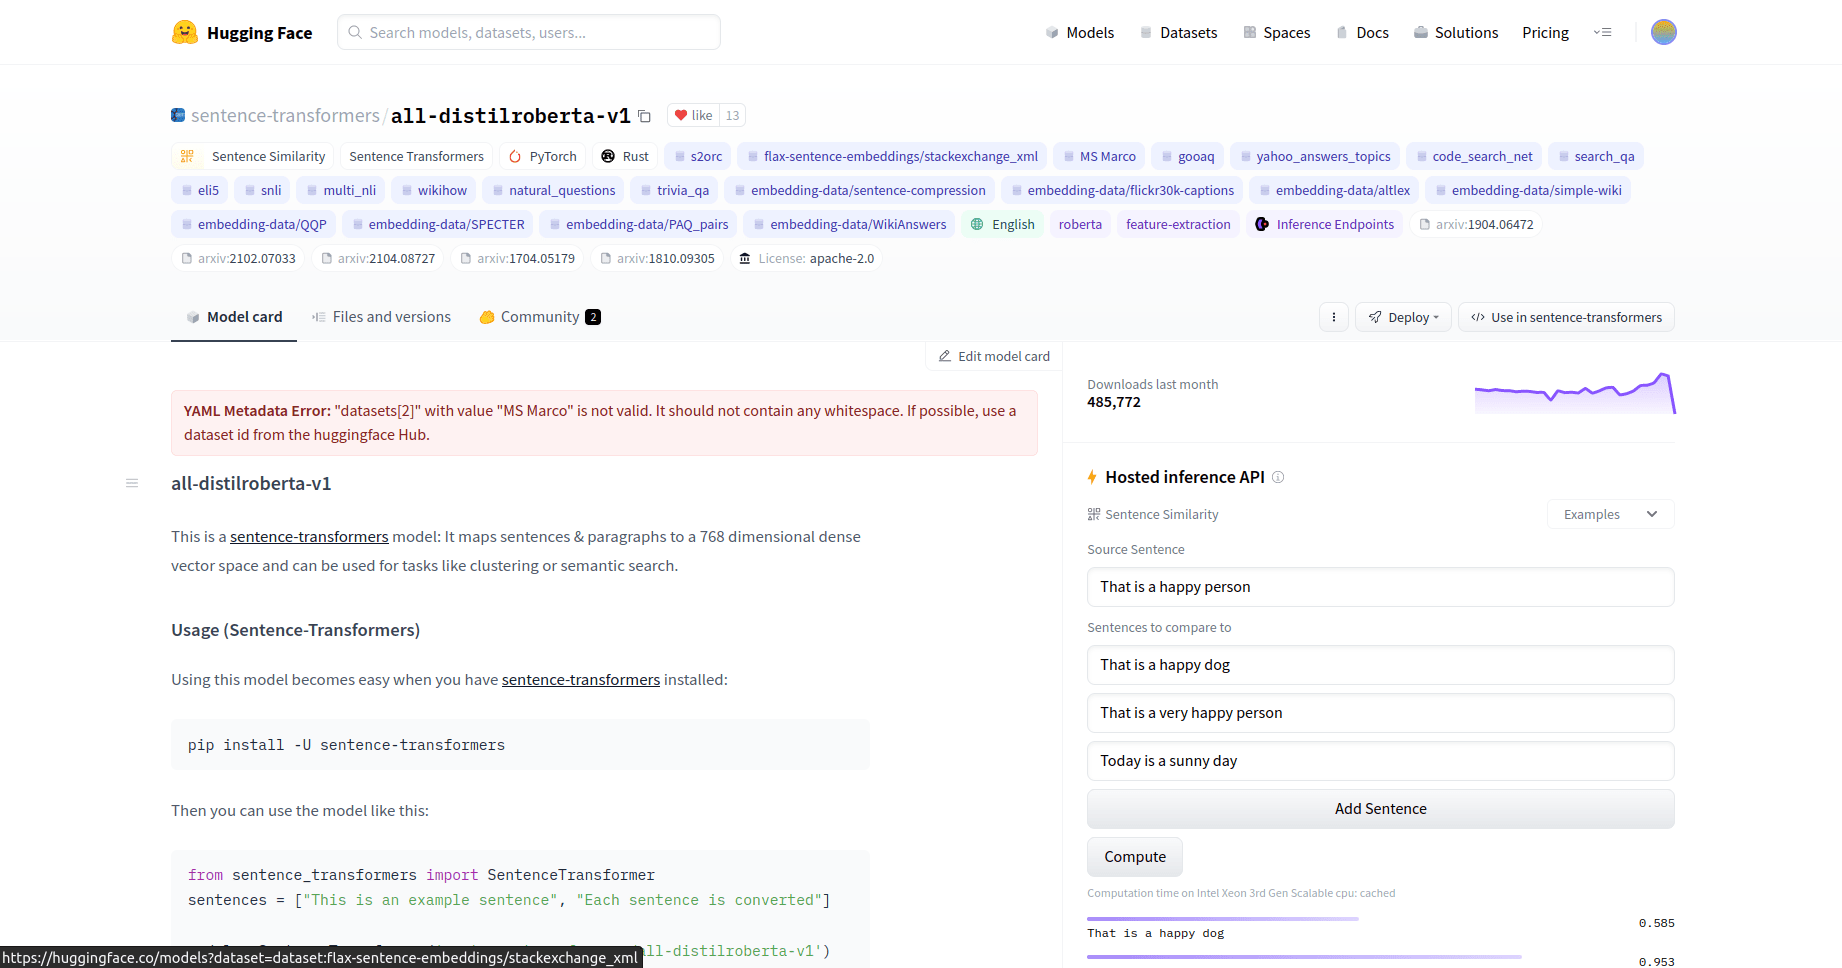
To accomplish this task, we will leverage the Eland Python library, an offering by Elastic. This library, renowned for its comprehensive data science functionalities, will serve as a conduit for importing the model from the Hugging Face model hub into Elasticsearch. Subsequently, this model can be deployed on machine learning nodes to cater to inference requirements.
Importing an embedding from Hugging Face into Elasticsearch.
Install the necessary Python libraries and import them.Elastic employs the eland Python library for downloading models from the Hugging Face hub and then loading them into Elasticsearch.
pip -q install eland elasticsearch sentence_transformers transformers torch==1.11
from pathlib import Path
from eland.ml.pytorch import PyTorchModel
from eland.ml.pytorch.transformers import TransformerModel
from elasticsearch import Elasticsearch
from elasticsearch.client import MlClient
import getpass

es_cloud_id = getpass.getpass('Enter Elastic Cloud ID: ')
es_user = getpass.getpass('Enter cluster username: ')
es_pass = getpass.getpass('Enter cluster password: ')

es = Elasticsearch(cloud_id=es_cloud_id, basic_auth=(es_user, es_pass) )
es.info()

hf_model_id='sentence-transformers/all-distilroberta-v1'
tm = TransformerModel(hf_model_id, "text_embedding")
es_model_id = tm.elasticsearch_model_id()
tmp_path = "models"
Path(tmp_path).mkdir(parents=True, exist_ok=True)
model_path, config, vocab_path = tm.save(tmp_path)
ptm = PyTorchModel(es, es_model_id)
ptm.import_model(model_path=model_path, config_path=None, vocab_path=vocab_path, config=config)

m = MlClient.get_trained_models(es, model_id=es_model_id)
M.body

s = MlClient.start_trained_model_deployment(es, model_id=es_model_id)
s.body

stats = MlClient.get_trained_models_stats(es, model_id=es_model_id)
Stats.body['trained_model_stats'][0]['deployment_stats']['nodes'][0]['routing_state']
Setting up Elasticsearch index and web crawler.
Step 1: Create an Elasticsearch Index
- Open Kibana from the Cloud Console.
- In Kibana, go to Enterprise Search -> Overview.
- Click “Create an Elasticsearch Index.”
- Choose the Web Crawler as the ingestion method and name the index “elastic-docs.”
- Click “Create Index.”
Step 2: Configure Ingestion Pipeline
- Navigate to the “Pipelines” tab.
- Click “Copy and customize” in the Ingest Pipeline Box.
- Add an Inference Pipeline in the Machine Learning Inference Pipelines box.
- Name the pipeline “elastic-docs_title-vector.”
- Select the trained ML model loaded in the previous Eland step.
- Set “title” as the source field.
- Complete the pipeline setup and click “Create Pipeline” at the Review stage.
Step 3: Update Mapping
- Access Dev Tools from the navigation menu.
- In the Console tab, update the mapping for the “dense_vector” target field with the provided code.
POST search-elastic-docs/_mapping {
"properties": {
"title-vector": {
"type": "dense_vector", "dims": 768, "index": true, "similarity": "dot_product" }
}- This step allows kNN search on the title field vectors.
Step 4: Configure Web Crawler
- Go back to Enterprise Search -> Overview.
- Under Content, click on Indices.
- Select “search-elastic-docs” from the available indices.
- Access the Manage Domains tab.
- Click “Add domain” and enter “https://www.elastic.co/guide/en.” Validate the domain.
- Add crawl rules one by one, starting from the bottom, and working up (Rules are evaluated according to the first match):
- ○ Disallow if Contains “release-notes.”
○ Allow if Regex matches “/guide/en/.*/current/.”
○ Disallow if Regex matches anything (“.*”). - Once all rules are in place, click “Crawl” at the top of the page, and then “Crawl all domains on this index.”
Step 5: Await the Crawl
- Elasticsearch’s web crawler will start crawling the documentation site, generating vectors for the title field, and indexing the documents and vectors. The first crawl may take some time to complete.
- While waiting for the crawl to finish, you can proceed to set up OpenAI API credentials and configure the Python backend.
These steps will help you store and index Elastic Documentation and prepare it for future search and retrieval using Elasticsearch.
Configuration of the Python backend.
You have the option to either clone or download the program from the following repository and make the necessary modifications.
Step 1: Install Required Python Libraries
- Ensure you have the required Python libraries by running: pip install -r requirements.txt
If you are running this on your laptop or a VM:
- Best practice is to set up a virtual environment for Python.
Step 2: Set Authentication and Connection Environment Variables
For command line usage, you can set these environment variables:
openai_api: Your OpenAI API Key
cloud_id: Elastic Cloud Deployment ID
cloud_user: Elasticsearch Cluster User
cloud_pass: Elasticsearch User Password
Example for setting environment variables:
Step 3: Run the Streamlit Program
- Execute the Streamlit program using the following command:
streamlit run elasticdocs_gpt.py
This command will initiate the program, and you will receive a URL in the command line. Access this URL in your web browser to interact with the application.
The central idea is to combine artificial intelligence and advanced search technologies, specifically using ChatGPT and Elasticsearch, to enhance knowledge bases and streamline information retrieval processes. This involves configuring machine learning nodes, integrating embedding models, setting up Elasticsearch indices, and using web crawlers to generate and index data for efficient search and retrieval. Additionally, the setup includes instructions for installing required Python libraries and running a Streamlit program for user interaction.