Elastic Beanstalk (EB) is a managed AWS service used to deploy, manage, and scale web applications and services. We can either use Elastic Beanstalk from the AWS Management console or from the command line using the Elastic Beanstalk Command Line Interface (EB CLI).
In this blog, we will use the Elastic Beanstalk Command Line Interface to deploy and monitor web applications. We will need EB CLI for this, Set up the Elastic Beanstalk CLI
In this blog, we will create a sample application and deploy it to the AWS cloud using the EB CLI.
Step 1 : Setup sample application
We need to setup a directory for the Elastic Beanstalk application, for this we will create a new folder called sample-app to use as a working directory and navigate into it.
$ mkdir sample-app

$ cd sample-app
Using command line, setup a new EB application using the following command:
$ eb init
Above command will prompt us to select a Region where the application should be deployed. Select the nearest region or Enter for the default one.
It will prompt for the application name, press Enter for the default one.
Enter Application Name

(default is "sample-app"):
Next we will be prompted for user credentials. Provide the Access key ID and Secret access key values, setup for the IAM user.
You have not yet set up your credentials or your credentials are incorrect

You must provide your credentials.

(aws-access-id): Access-key-id-here

(aws-secret-key): Secret-key-id-here
Now select a platform to use. We can choose any no corresponds to the following given platforms, here we will go with 6) Node.js and press Enter.
Select a platform.

1) .NET Core on Linux

2) .NET on Windows Server

3) Docker

4) Go

5) Java

6) Node.js

7) PHP

8) Packer

9) Python

10) Ruby

11) Tomcat

(make a selection): 6
Now, it will prompt you for the platform branch or version, choose the one of your choice.
Select a platform branch.

1) Node.js 18 running on 64bit Amazon Linux 2023

2) Node.js 18 running on 64bit Amazon Linux 2

3) Node.js 16 running on 64bit Amazon Linux 2

4) Node.js 14 running on 64bit Amazon Linux 2

(default is 1):
Now it will prompt you for the SSH, depending on your need, here we will go with yes .i.e. Y
Cannot setup CodeCommit because there is no Source Control setup, continuing with initialization

Do you want to set up SSH for your instances?

(Y/n): Y
Choose SSH key pair
Type a keypair name.

(Default is aws-eb):
Here the application setup concludes.
Step 2 : Deploy application
Now, let’s start deployment of the application, for the run the following command,
$ eb create
When prompted to “Enter Environment Name”, provide your name or press Enter for the default name.
Enter Environment Name

(default is sample-app-dev):
When prompted to “Enter DNS CNAME prefix” type in a unique DNS name for the application and press Enter.
Enter DNS CNAME prefix

(default is sample-app-dev22):
Next, it will prompt to select a Load Balancer type. Choose Enter to accept the default or chose the one of your choice
Select a load balancer type

1) classic

2) application

3) network

(default is 2): 2
For Fleet requests type N, or you can go with y if you need it.
Would you like to enable Spot Fleet requests for this environment? (y/N): N
When prompted to specify or create an Elastic Beanstalk service role, press Enter to have Elastic Beanstalk create one for you.
Note : This prompt only shows up the first time you use Elastic Beanstalk.
2.0+ Platforms require a service role. We will attempt to create one for you. You can specify your own role using the --service-role option.

Type "view" to see the policy, or just press ENTER to continue:
Press Y to download the sample application code into your current directory
NOTE: The current directory does not contain any source code. Elastic Beanstalk is launching the sample application instead.

Do you want to download the sample application into the current directory? (Y/n): Y
As this process proceeds, the EB CLI will output progress events to the command line. The EB CLI will warn you that it is creating a sample application for you. Then it will create the AWS resources to run the application, and then deploy the application to those resources.
Step 3 : Monitor application
Following command will open your live application in a browser,
$ eb open
To view the status of the application the EB CLI has created for you, enter the following command,
$ eb status
Output
Environment details for: sample-app-dev

  Application name: sample-app

  Region: us-west-2

  Deployed Version: app-230808_191013988856

  Environment ID: e-fqpcayzeyi

  Platform: arn:aws:elasticbeanstalk:us-west-2::platform/Node.js 18 running on 64bit Amazon Linux 2023/6.0.0

  Tier: WebServer-Standard-1.0

  CNAME: sample-app-dev22.us-west-2.elasticbeanstalk.com

  Updated: 2023-08-08 14:12:52.097000+00:00

  Status: Ready

  Health: Green

Alert: An update to the EB CLI is available. Run "pip install --upgrade awsebcli" to get the latest version.
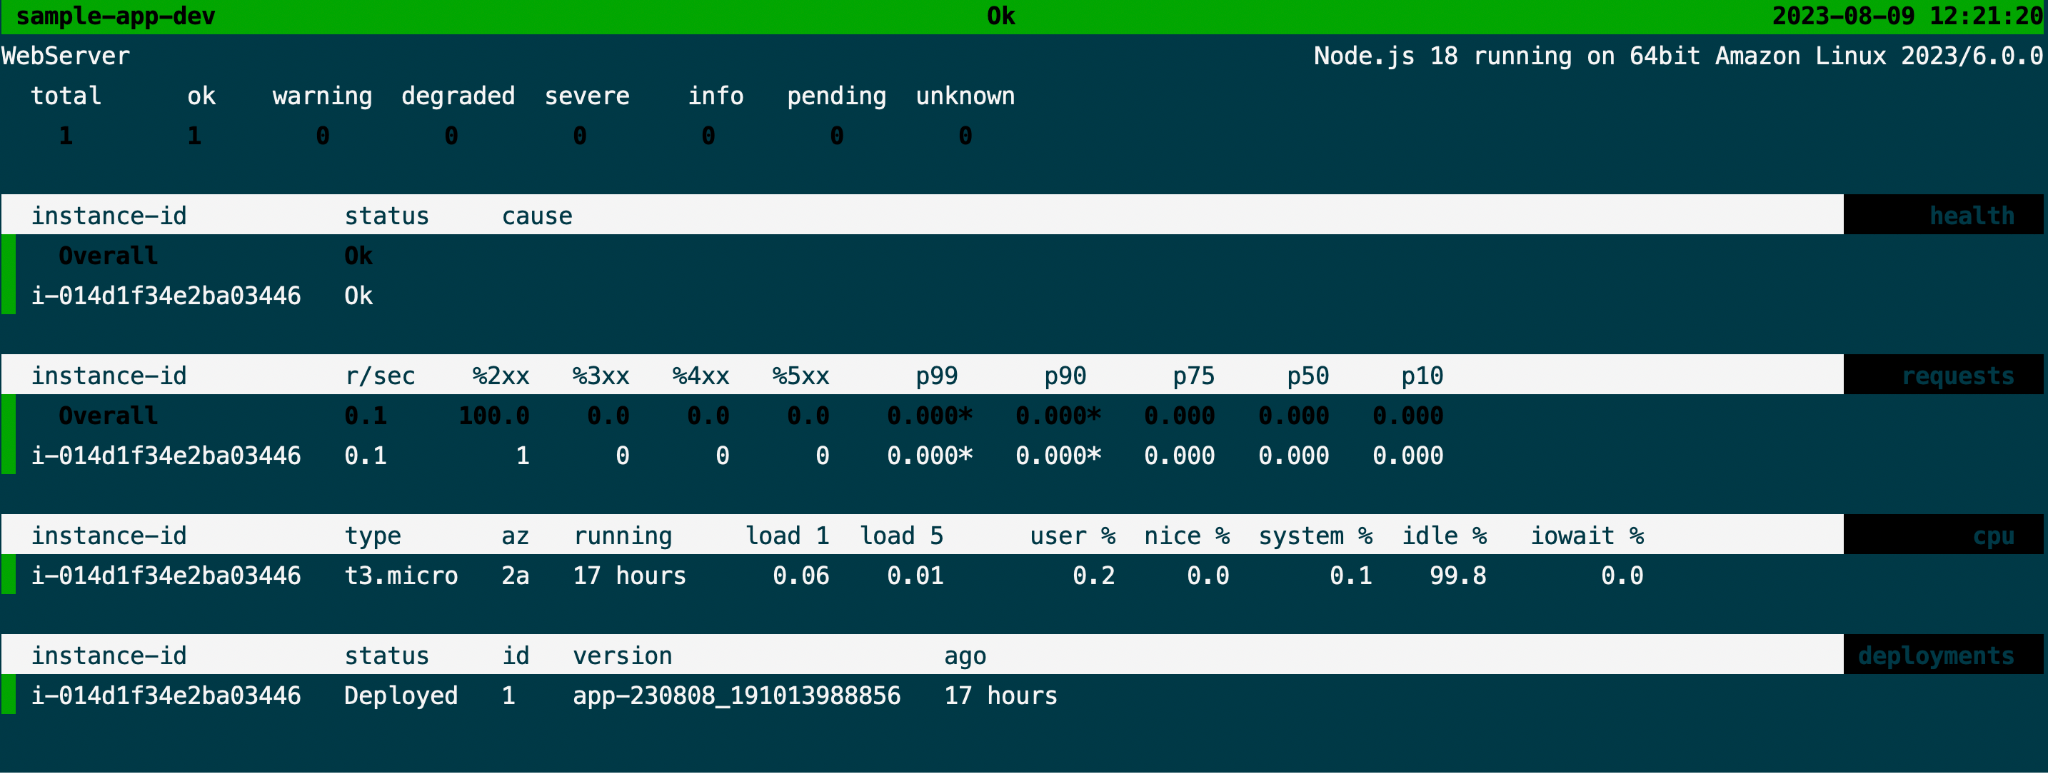
To view the health of the computing resources the EB CLI has created for you, enter the following command,
$ eb health]
At the end to terminate all the created resources, run the following command,
$ eb terminate –all